How to add and manage Netflix profiles

📋 Table of Contents
Table of contents will be generated automatically based on article headings.
Ever since I signed up for Netflix’s streaming only plan, its suggestions have been largely fultile. That’s because my two kids have been the majority users of the service from the start &, thus, have clogged up Netflix’s recommendation engine with Disney sitcoms and superheroes and mutant turtles and other cartoon stuffs. Thankfully, I can now keep their fare separate from mine because now Netflix has introduced profiles which is a great thing.
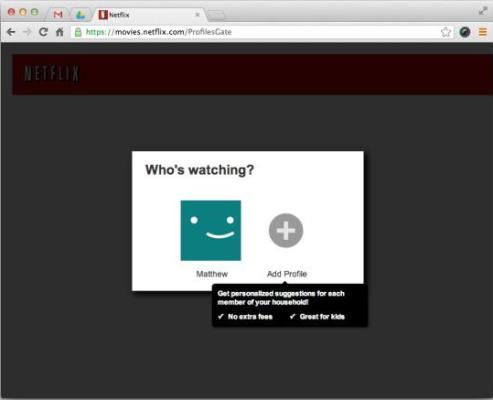
When you access Netflix from a PC, you should see a pop-up window with one profile already created from your existing account along with an option to add a new profile. To add a profile, you only need to enter a name, and you can also choose an avatar for every profile. While I could access my various profiles (one can create up to five per account) on my iPad and Apple TV, I couldn’t add a new profile with either device.
Switching profiles is so easy, tap on the current profile in the upper-right corner to see all the profiles. On Apple TV and the iPad, you’ll get a pop-up window with your profiles shown on them. On a PC, you’ll get a drop-down menu with your profiles along with a Manage Profiles option. From the Manage Profiles page, you can add a new profile and edit the name and avatar of an existing profile or delete it. You can also check a box to allocate a profile as “for kids under 12.”
Netflix makes use of the shows you watch to give recommendations. If you are like me and watch Netflix less than your children do, I suggest you to use the first profile that Netflix begins you out with for your kids, and then create a subsequent profile for your purpose.
joseph cyriac is a contributor at How To Guide. We are committed to providing well-researched, accurate, and valuable content to our readers.
You May Also Like


Related Articles